
Digital note taking has a lot to recommend it over the paper sort, as discussed in part one of this article. My first experiment using an iPad and GoodNotes4 worked out well, but also whetted my appetite for a more sophisticated note taking solution. As before, this is both a hardware and software problem. I sought to optimize both when I recently set out to buy a new personal computer. On the hardware side, I was very interested in moving from a table plus laptop solution to a two in one tablet/laptop combination running Windows 10 (my second preference after Linux) to save on both weight and headaches. Microsoft’s OneNote stood out as the obvious software choice in my case as it is clearly one of the most sophisticated platforms (generally considered on a par with Evernote) and I already use Office extensively. I ended up taking something of an odyssey to get from that simple starting point to a solid (but not perfect) working solution.
Experiment #2: Digital Notes in OneNote 2016 on a Windows 10 Tablet
The options for my second adventure into digital note taking were unlimited since I was putting together hardware and software for personal use. My preferences, as discussed above, quickly led me to Windows 10 based 2-in-1 computers capable of running the full Microsoft Office suite including OneNote. Within that space, however, there are a lot choices spanning a surprisingly large range of price points and capabilities which did not always seem well-correlated. I ultimately decided to buy a relatively inexpensive HP Pavilion x2 12″ Detachable Laptop running Windows 10 and an Office 365 subscription. It’s an effective package within the financial reach of most students and professionals, but not without its flaws:
My Personal Notebook Setup:
Microsoft OneNote 2016 (part of Microsoft Office 2016)
Microsoft OneNote is a fantastic note taking platform that is vastly more versatile and useful than GoodNotes4. For example, OneNote can record just about any content you throw at it including: text, pictures, handwriting, file attachments, file printout screenshots, audio, and video. The OneNote search function is truly impressive and successfully recognizes and indexes everything from typed text, to handwriting, to the text in pictures. Finally, there are myriad ways to organize your notes into notebooks, tabs, and pages.
So, why did I not start with OneNote instead of GoodNotes4 if it is so superior? Beyond the restrictions I face at work, getting started with OneNote can be a bit confusing and overly complicated, which led me to put off trying it. The first thing to understand about OneNote is that there are two significantly different current versions of the program: “OneNote” and “OneNote 2016.” The version branded as just OneNote is free, cross platform, and more cloud oriented (in fact you can only save your notes to the cloud). OneNote 2016 comes with the Office suite and includes more power user features: stronger Office integration, handwriting to text conversion, the option to store notebooks locally, an equation editor, etc. Microsoft details the differences here, but fails to explain why they elected to give two products virtually the same name and confuse people. I have actually ended up using both versions. The lighter weight, cross platform OneNote gets used on my iPhone for spur of the moment notes, grocery lists, etc. and all the material automatically syncs to my laptop. The full OneNote 2016 program then takes on the heavy lifting of my handwritten and digital personal research notes.
OneNote 2016 has so many features that some familiarization and customization are necessary to adapt the software to your workflow and style. Here are some tips and suggestions from my experience setting up the software:
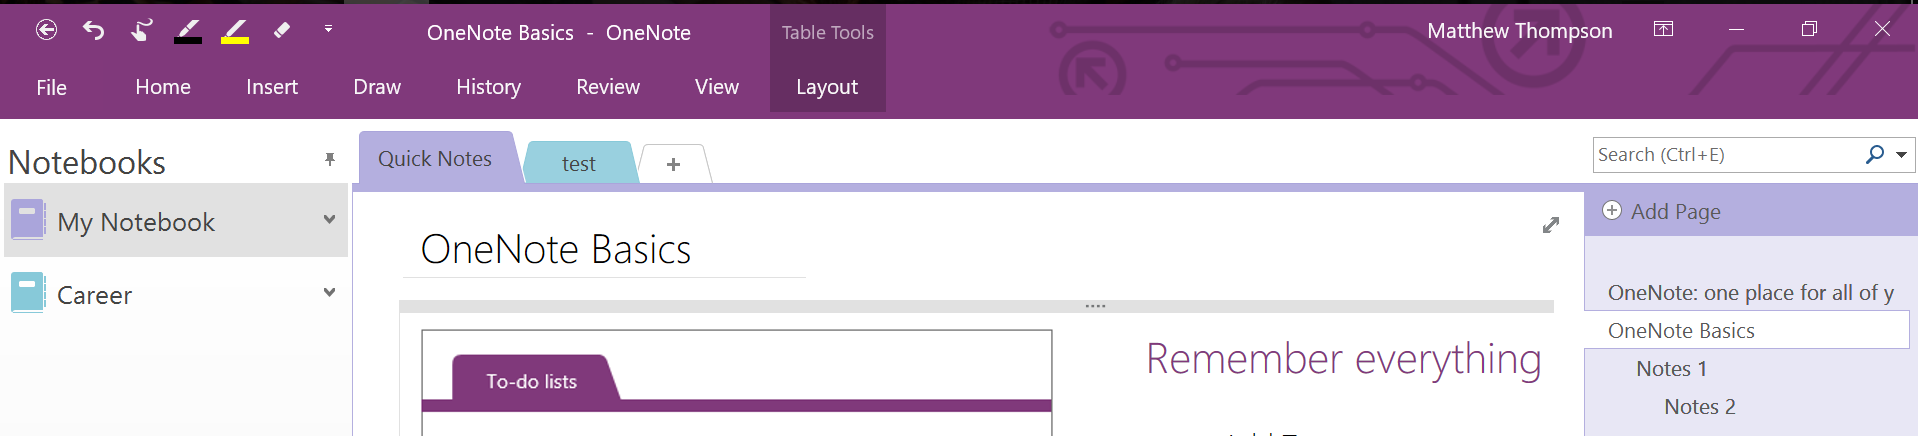
- Understand Notebooks vs. Sections vs. Pages: Before you really get going on OneNote 2016, I recommend getting to know the main organizational hierarchy: Notebooks → Sections → Pages. Navigation areas for Notebooks (left), Sections (tabs in the middle), and Pages (right) are visible in the screen shot below. What I discovered using the software is that it is easier to navigate a notebook with fewer sections containing lots of well-organized pages. Every page can have two levels of sub-pages under it (see the indented Notes 1 and Notes 2 pages in the image), and the user can show or hide those sub-pages with one mouse click. Pro Tip: If you ever have trouble with the search function not finding things, then try closing and reopening all your notebooks which will often clear the problem.
- Customize the Quick Access Toolbar: OneNote 2016 has a fully customizable quick access tool bar at the top left corner of the screen. A screen shot of mine is shown below. I used the little down arrow at the right to open up the customization menu and create a toolbar optimized for handwriting with a passive stylus. Writing with a passive stylus requires switching into Draw with Touch mode (the hand with the curved line in the image below) so it is handy to have easy access to that command, as well as a pen, highlighter, and eraser. Note that you need to select “More Commands . . .” under the customization menu in order to see every possible option.

- Rule Lines on New Pages: By default, OneNote 2016 generates blank new pages. That did not work for me at all as I have a strong preference for handwriting on pages with rule lines. You can switch the default by going to Files → Options → Display, checking “Display all new pages with rule lines” and then clicking “OK.”
- Portrait Full Screen Mode:
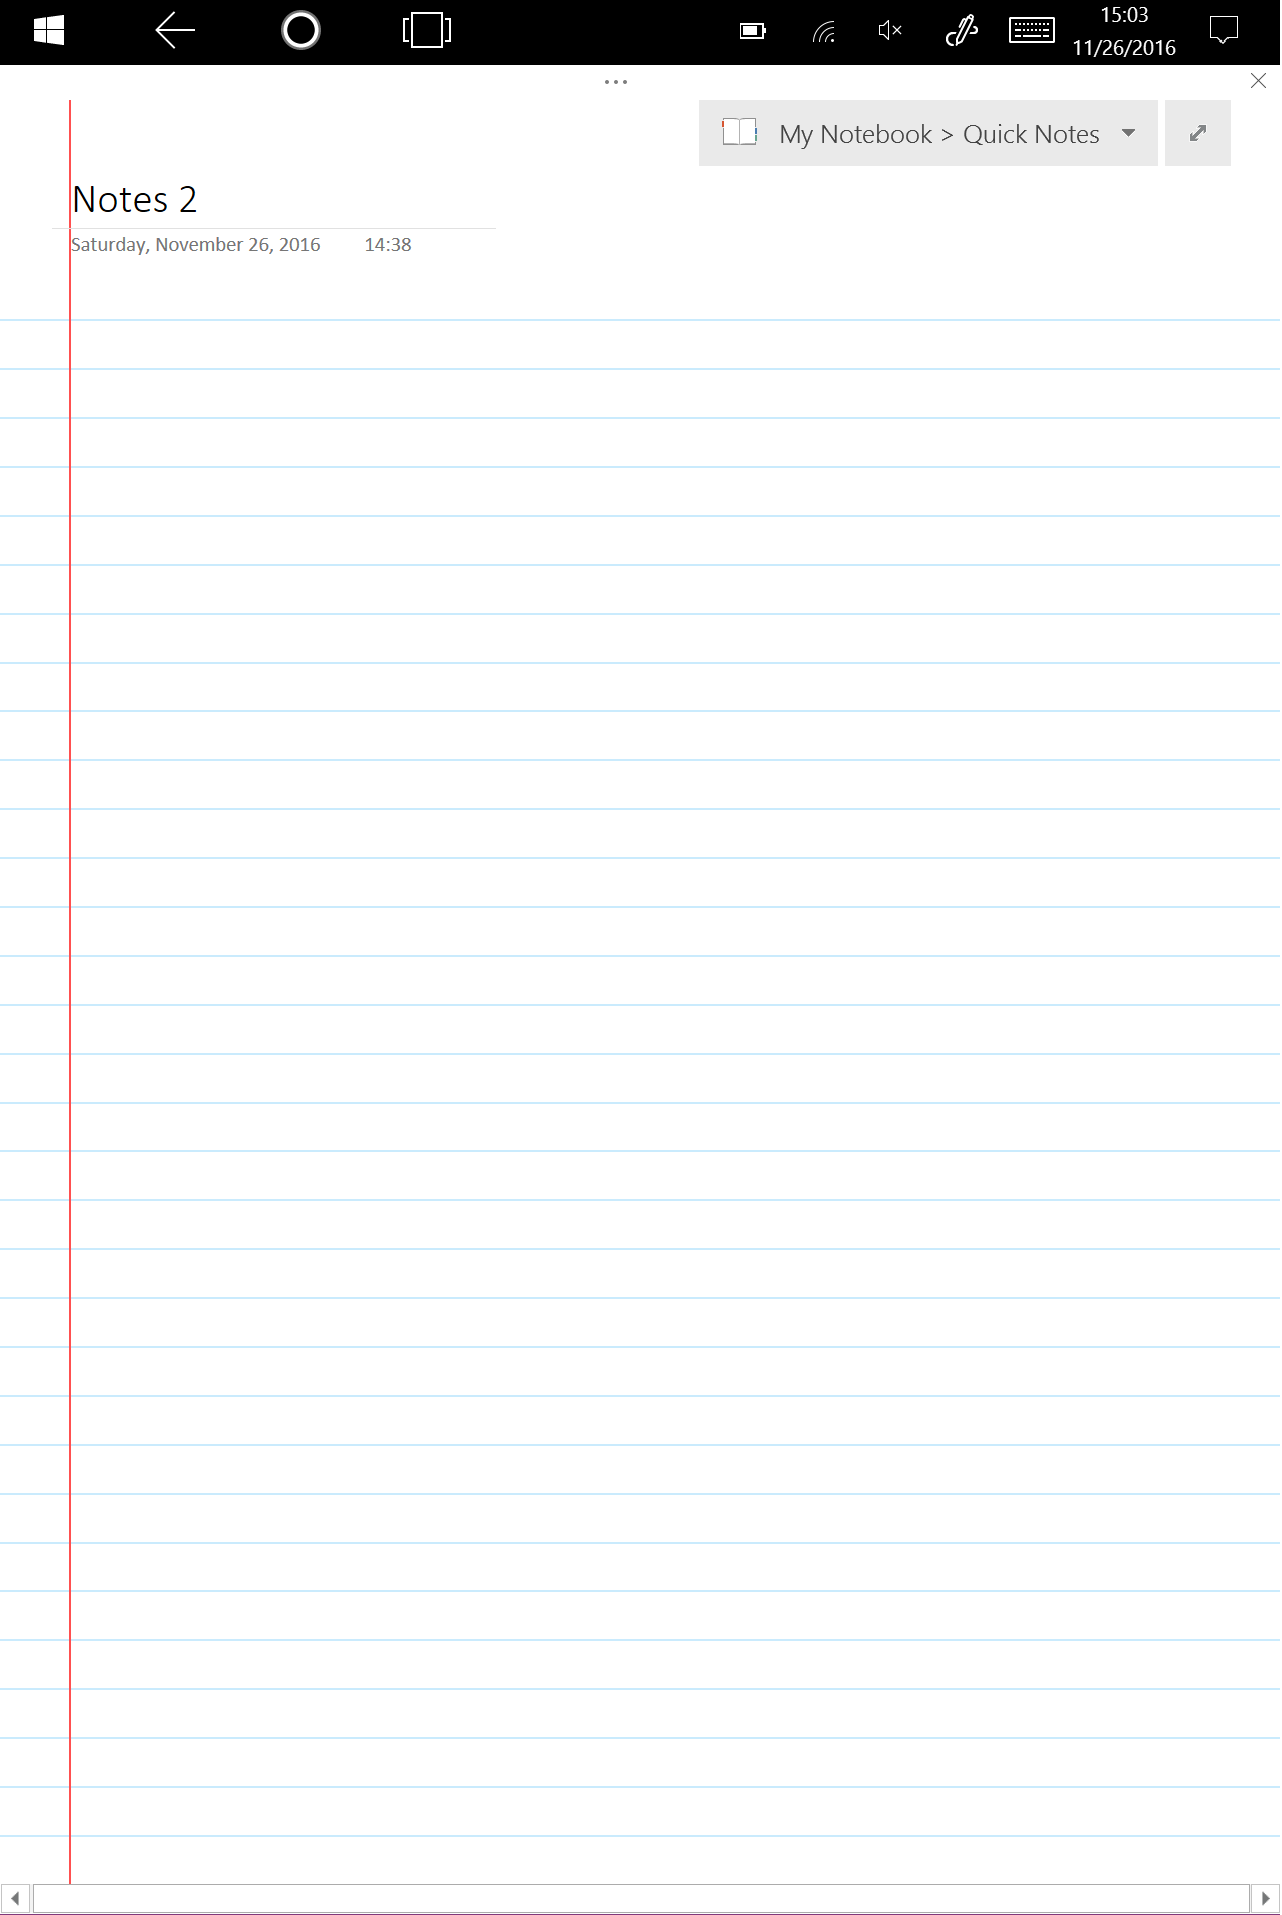 Using OneNote 2016 in full screen mode with rule lines is the best approximation to a digital paper notebook I have yet seen (image at right). You can get to this configuration by hitting the diagonal arrows at the upper right corner of the note page area and turning your table to portrait orientation. Note that there is a big difference in how you take notes in this mode depending on whether you use an active or passive stylus. With an active stylus that supports palm rejection you can place your pen tip and hand on the screen to write and then lift off both and use a finger tip to scroll to a blank area on the same page if you like the default auto page size mode. With a passive stylus you must write in the Draw with Touch mode described above. That means the page is locked and a touch with either a stylus or finger will make lines. If you want more writing space without exiting either the full screen or draw with touch modes, then creating a new page is simply a matter of two taps: first tap the grey notebook box at the top right of the screen and then tap “Add Page.” I actually prefer note taking in this mode because it means all my notes fit neatly onto regular size pages for later PDF generation or printing and it avoids the screen jump that can occur when a tablet gets confused about when palm rejection is on or off. Speaking of palm rejection, writing on a big screen in Draw with Touch mode requires a physical palm rest to prevent stray pickups. I use a folded up microfiber cleaning cloth (see below) and it works great. Finally, I will mention that you can hand write the note page title at the upper left instead of typing it and OneNote 2016 will automatically convert the handwriting to text via optical character recognition and display it in the page navigation menu.
 - Turn on the Scratch Out Gesture: The scratch out gesture saves me lots of time by allowing me to erase writing by drawing a horizontal line back and forth over my mistakes. An active stylus may have an embedded eraser mode button, but passive styli do not, making it necessary to go to the menu and select an eraser mode if scratch out is off. To turn the scratch out gesture on go to Files → Options → Advanced → Pen, uncheck “Disable the scratch-out gesture while inking” and click “OK.”
If you already have a Windows tablet you like, or have a Windows laptop and are happy to do without handwriting, then the rest of this article may not apply to you. However, if you are in the market for a new Windows tablet or 2-in-1 laptop, you may be interested in reading about my experiences with the HP Pavilion x2 12″ 2-in-1 laptop.
HP Pavilion x2 12″ Detachable Laptop with Windows 10
The Pavilion x2 (~$550 new, ~$400 used) is lightweight and has a magnetically attached keyboard that you simply pull off when you want to use the computer as a tablet. I really like the detachable keyboard style, rather than the flip around keyboard style common on a lot of 2-in-1 laptops, because it significantly reduces weight when using the system in tablet mode. Other key features include a 12″ screen with an 3:2 aspect ratio. This makes the dimensions of the computer (8.66″ x 11.81″) nearly the same size as an 8 1/2″ x 11″ sheet of paper. The active area of the screen (6.5″ x 10″) provides nearly the same writing area as a standard sheet of US letter paper (assuming standard ~1″ margins). Battery life is not fantastic, but it is pretty easy to go all day with the screen brightness turned down and the battery saver mode turned on. The screen supports both active and passive styli (more on that in a minute). The system also runs full Windows 10, which offers maximum versatility. I had no complaints about my new HP Pavilion x2, until I tried to write on it.
HP Active Pen Product number: T5E12AA#ABL
I did my research before buying the Pavilion x2 and knew in advance that it supported an active stylus (the type that has a battery and communicates with the table to enable functions like palm rejection) but does not come with one. So, one of the first things I did after getting the computer was to order the official HP stylus made to work with it (the T5E12AA#ABL linked to above) for ~$60. I was not thrilled with the price, but was happy to pay it for an “it just works solution” for handwritten note taking. Sadly, the stylus was quite a let down. First, it was rather small, closer to crayon size than normal pen size, which makes it uncomfortable if you have large hands like mine. Second, it worked, but not reliably. Infuriatingly, the stylus would sometimes 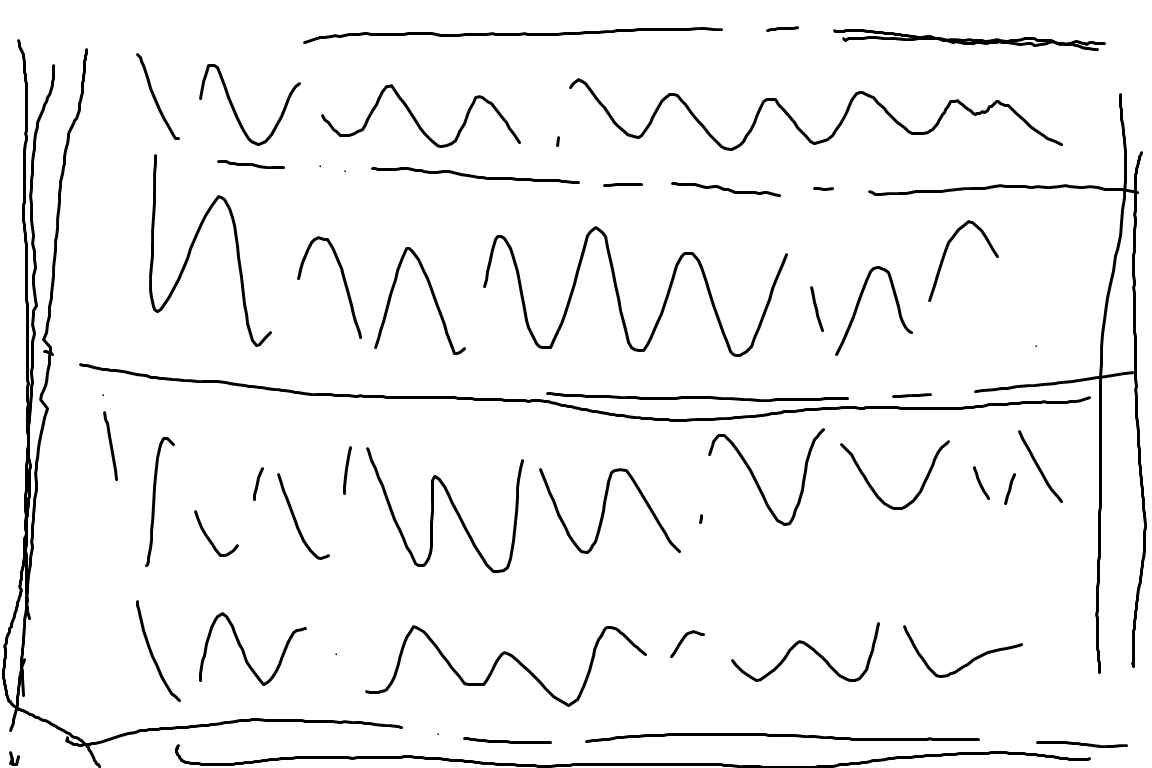 work flawlessly and sometimes skip horribly with no apparent pattern to the failure. By “skip” I mean that trying to draw a solid line or squiggle would result in randomly dashed lines as in the figure at right. I tried all manner of computer restarts, drive restarts, updates, etc. all without remedying the intermittent skipping problem. I even returned the stylus and got a new one, but the same problem remained. So, I tried a different stylus.
Lenovo Active Capacitive Pen (GX80K32882)
Let me start this section with a warning. You might expect that active styli are interchangeable commodity items, like computer mice, that you can mix and match with various tables to suit your personal preference. This is not the case. What’s worse is that the manufacturers supply virtually zero information on compatibility, even among their own products. Fortunately, during my research I ran across the Introducing the Ultimate Active ES Pen Compatibility Chart by Rick Rodriguez. Rick deserves some sort of major award for bringing some clarity to the chaotic mess that is stylus compatibility. Using his chart, I determined that the Lenovo GX80K32882 is cross compatible with the HP T5E12AA#ABL, so I ordered one to see if it worked. What I discovered when it arrived is that the Lenovo stylus is superior to the HP in every way. It’s bigger and more pen like, ships with three spare writing tips (the HP came with none), seemed to have a stronger signal that the computer detected more easily, and was cheaper (~$35). Unfortunately, despite the overall better performance, I also experienced random skipping with the Lenovo.
At this point, it seemed logical to conclude that the problem is with the computer rather than the stylus. I took so long figuring this out, that the return period for the computer had lapsed. Therefore, I had to deal with HP customer support and service, which I found to be terrible. I spent hours on the phone and in remote support sessions without encountering anyone who might have an idea of how the active stylus screen digitizer works or what might have gone wrong. It was just endless repetition of one-size-fits-all checklists of reboots, uninstall drivers, reinstall drivers, etc. In the end, they would not just replace the computer, but insisted I send it in for repairs, which would mean being without it for about a month. Given that HP warranty repair service gets abysmal reviews online, I faced the prospect of losing the computer for a month with low odds of the problem getting resolved. I decided to forgo that frustration and live with the machine as is.
Adonit Jot Pro Fine Point Precision Stylus [Previous Generation]
Even with the active stylus features of the computer on the fritz, the passive capacitive touch screen worked just fine. That meant my old standby the Adonit Jot Pro (~$25) worked on the Pavilion x2 screen perfectly. As I discussed in part one, the Adonit uses a ball-joint-mounted hard plastic disc which feels almost exactly like a ballpoint pen when writing on the screen. It also requires no batteries and has embedded magnets that allow it to stick to the magnets in the Pavilion x2 that attach the keyboard. I love these and own three. My only complaints are the lack of a clip (which is remedied in the new version Adonit Jot Pro Fine Point Precision Stylus) and the susceptibility to damage when dropped. If it falls while the screw on cap is off and lands on the writing tip, then there is a good chance the thin metal shaft holding the disc will get bent, and I have never successfully bent it back. Fortunately, I have only dropped my Jots a couple of times and a small bend in the shaft does not impede the performance of the stylus. The writing disc can also pop off and get lost, which is why they sell spares (Adonit Replacement Discs
). Using a passive stylus successfully with OneNote requires operating in “Drawing with Touch” mode as described above.
Celicious Matte HP Pavilion x2 12 Anti-Glare Screen Protector
Rubbing hard plastic on glass is going to scratch it eventually, so a $14 set of screen protectors is a wise investment. The Jot Pro works just fine through the protector. I even like the feel better than writing straight on the glass. If your Pavilion x2 actually works with an active stylus, then you may not need or want a screen protector since the limited active stylus use I achieved seemed to be impeded by the extra plastic layer.
Clean Screen Wizard Microfiber Screen Cleaner and Protector Kit
These make great palm rests when folded up a few times and placed between the screen and the heel of your palm. They are also handy for wiping down the screen when it gets dirty. I find it convenient to store one between the bottom of the keyboard and the cover.
Mama Mouth PU Leather Folio 2-folding Stand Cover for 12″ HP Pavilion x2 12
The surfaces of the Pavilion x2 are rather smooth. In fact, the computer can be quite hard to hold onto in tablet mode. I find that adding a cover makes the device much easier to use. The Mama Mouth PU (Faux) Leather Folio (~$20) is one of the only cover options I found for the Pavilion x2. Fortunately, it is both functional and professional looking.
In summary, I strongly recommend OneNote 2016 as an all-purpose note taking platform. I still like and use my HP Pavilion x2, but it is hard to recommend without reservations. If you do decide to try one, I strongly recommend testing all the computer’s features right out of the box so you can return it and get a new one if something is wrong.